We saw the Drifters at the Smokey Mountain Performing Arts Center in Franklin, NC in early April with our sister-in-law Sharon. I’ve been to hundreds of concerts, but have never seen a Motown type act.
The Drifters formed back in 1953. They had many hits including: Under the Boardwalk; Save the Last Dance for Me; and There Goes My Baby among others.
They are one of the “least stable” vocal groups. George Treadwell got control of the group’s name and more than 60 vocalists have been in the lineup at one time or another. The business model is not unusual over the last seventy years. A band has some hits that become favorites. The original members leave the band, but someone owns the band name. The owner of the band name hires people to perform the band’s hits under the original name and takes a substantial slice of the income. I’ve seen quite a few bands working under this business model including Foreigner, Count Basie’s Orchestra, and Benny Goodman’s band. None of the original members were performing at any of the concerts that I saw.
The Drifters (2024) gave a good professional show. They played all of the band’s hits. The four members rotated being lead vocalist. Whomever was a background singer did Motown type dance moves while performing the background vocals. The Drifters also played other well-known songs from that time period that the audience enjoyed. They even managed to get a substantial portion of the almost sold-out venue up and dancing at various points.
This sort of show is more or less a professional tribute band. They do a good job replicating the music and I’ve enjoyed every performance of this sort that I’ve ever attended.
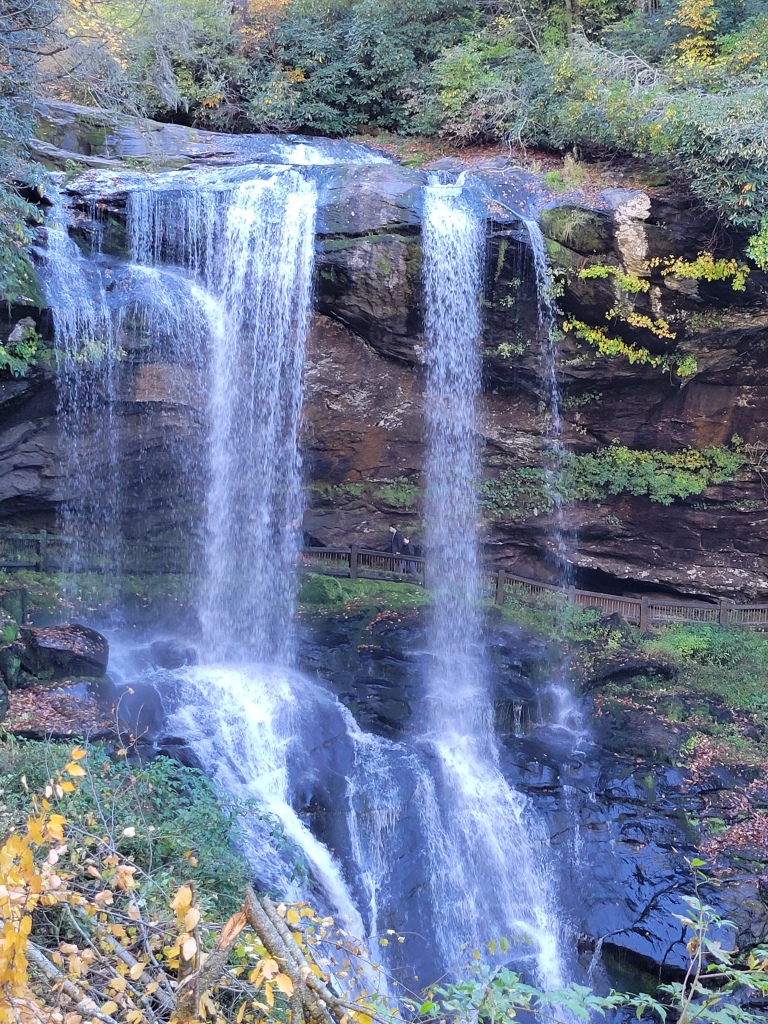
The Franklin, NC area has many beautiful waterfalls. Dry Falls is a favorite of ours because it is both beautiful and close. When there is a lot of water, it is extremely loud.
The entire Southeastern United States was in a profound drought in 2023 with very little rain from June through October. This was the 3rd worst drought in my lifetime. Dry Falls gets its name for “never running dry,” but it can get into a sad state. This is Dry Falls in mid-October, 2023.
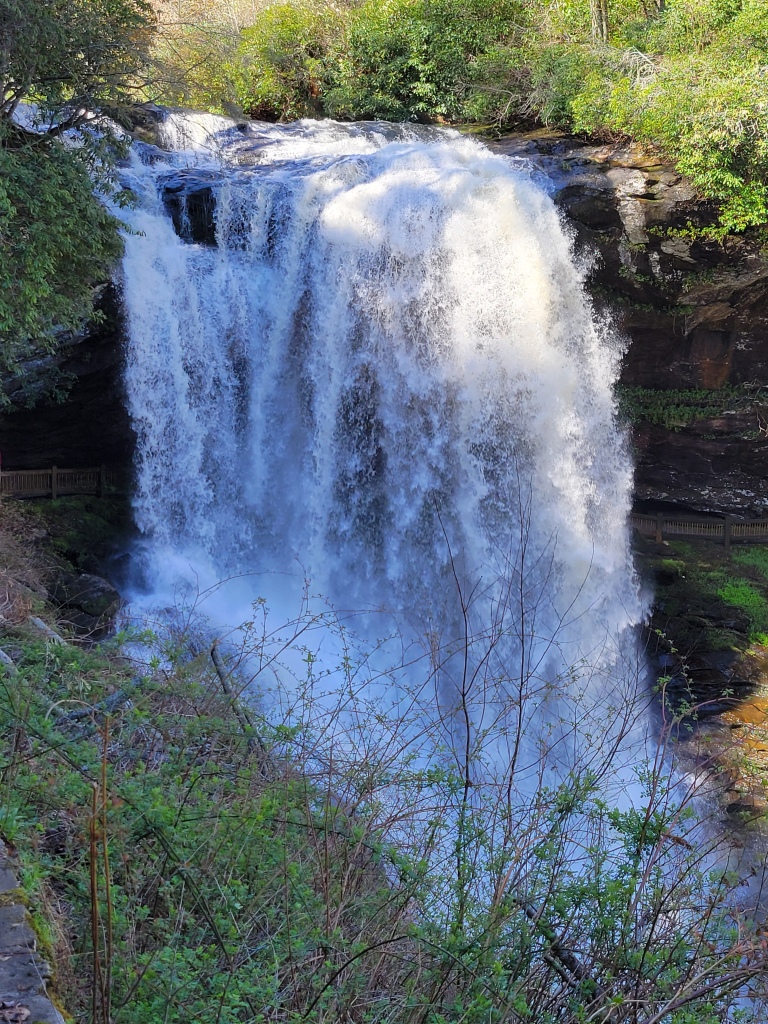
The drought was over after heavy rains from November through January. This continued into heavy rains and snow through April. We went back in early April and Dry Falls was as large as we have ever seen it. These two pictures were taken in close to the same trail location.
I recently finished The World Crisis Volume 2: 1915 by Winston Churchill and 1939: The World We Left Behind by Robert Kree. Both were inexpensive kindle history purchases. Most of Churchill’s histories have been put on sale at various times for less than $5. Both books are briefly reviewed.
The World Crisis Volume 2: 1915 is from Churchill’s perspective. He started 1915 as First Lord of the Admiralty (comparable to a civilian head of the US Navy) during WW1. When a unity government was formed in the UK after a failed offense on the Western Front and lack of progress in the Dardanelles, he lost his position as First Lord but retained his seat on the War Council.
Churchill’s main theme is that neither the British Commonwealth nor the French could strategically break through the German lines during 1915 on the Western Front in World War 1. The British Navy had overwhelming superiority over the German and Austrian surface fleets. There were quite a few pre-dreadnaughts and other obsolete capital ships which could be used to support amphibious landings or cause other trouble for the Central Powers (Germany, Austria and Turkey) without hurting the UK’s ability to destroy the German surface navy. Last, both Serbia and Russia were hampered by a lack of military equipment and supplies. If Entente naval forces could be used to knock Turkey out of the war, both Russia and Serbia could be supplied. This would put considerable pressure on the Central Powers. Ample historical evidence is provided by Churchill that this was his opinion at the time and not historical revisionism.
Churchill supported an aggressive Naval attack on the Turkish Navy and land forts to open up a supply line through the Dardanelles to the Black Sea. Germany lacked the logistics network to reinforce Turkey until Serbia was defeated and Bulgaria entered the war late in 1915. Thus, a strong naval push accompanied by sufficient ground forces could take Constantanople and potentially knock Turkey out of World War 1. Churchill thought there were sufficient ground forces on the Western Front to prevent a strategic German advance if there was a strong push against Turkey.
Churchill’s histories follow the same pattern. Each chapter begins with a list of major topics. Next there is a prose summary of chapter events. Each topic is addressed in turn with an individual summary plus official documents or correspondence on the topic. I’ve read a number of Churchill’s histories where he played a major part in events. I found that I could skip the official documents or transcripts of letters within a chapter and lose little to nothing about the topic. This writing style is excellent for buttressing your claims and the arguments of the day but is redundant to the reader examining events of more than a century ago. If I was writing a history, having someone point out source documents would be wonderful. But as a reader I found this writing style to be somewhat painful to read until I learned I could skip the letters and documents and read the summaries.
Churchill and subsequent official enquiries faulted the leadership during the initial landings in the Dardanelles for failing to quickly advance while they had superiority. While true, Britain did not have experience in large scale (multiple division amphibious invasions) at the turn of the century. Churchill also criticized the decision after the withdrawal from Gallipoli to start attacking the Turks at Gaza at the periphery of their territory instead of landing further North in Mesopotamia.
In my layperson opinion as a reader of military history and an avid wargamer, Churchill was certainly correct that the Western Front in 1915 was hopelessly stalemated. A strategically successful offense on that front was not possible with the technology and doctrine of 1915. Russia and Serbia desperately needed military supplies. The British Navy also had a massive superiority in 1915. Merchant losses to German submarines at that time were minimal. I don’t know if the British Navy had the logistics and expertise to launch a successful large scale amphibious attack in 1915.
1939: The World We Left Behind by Robert Kree is one of the more unusual histories I have read. Laypeople are informed of current events (including wars) largely through the media. Kree uses newspaper archives to cover what those who read multiple leading newspapers at the time knew about the Spanish Civil War, the Invasion of Poland by Germany and the USSR, major diplomatic moves, and other events. He covers these events in historical sequence.
About a third of the book covers January. The Barcelona front collapsed and Franco took control of Spain ending the Spanish Civil War. Kree has a UK centered perspective. Most of his source material are various United Kingdom papers supplemented by French, German and Soviet newspapers. Only one US newspaper (the New York Times) covers US opinion of the time.
I’ve experienced multiple wars in my lifetime. The Cold War, Vietnam, Grenada, Nicaragua, Iraq 1 & 2, the Afghanistan Wars (US and USSR), The Balkins, Ukraine and multiple wars in the Middle East. Informed citizens find out about these wars initially from the news. Years later books are written and other post-hoc arguments are made. I’ve always kept up with current military conflicts, but many in the public do not.
I’d never read a book quite like Kree’s and I enjoyed it greatly. Similar books (Berlin Diary and others) have the viewpoint of one individual, paper or nation. By referencing newspapers from many nations, Kree provides month-by-month developments during 1939 from a much broader perspective. I did not learn much that I did not already know, but I did experience the flow of events during the cataclysmic year of 1939.
Because I have some fine buddies in Alabama with great meat connections, we buy more than one lamb a year. This yields wonderful lamb chops. Lamb chops are pretty fatty and are good on the grill over direct heat.
The most common way I grill them is to put some fresh rosemary branches on top of the chop. When flipped, the rosemary is directly on the grill. With good meat and fresh rosemary this is always excellent.
Recently we came up with a marinated lamb chop recipe. The marinade is a modified marinade from the Meathead cookbook. The ingredients are:
1/2 teaspoon coarse kosher salt
1/4 cup of red wine vinegar
1/4 cup of balsamic vinegar
1/4 cup of olive oil
1 teaspoon of dried rosemary (or 3 tablespoons of chopped rosemary leaves)
2 heaping tablespoons of minced garlic
Combine the ingredients in a pyrex dish and add the chops. Be sure to ladle the marinade on top of the chops including healthy amounts of rosemary and garlic. We usually marinade the chops 8-12 hours in the refrigerator before grilling. Grill on high heat. If you sear the exterior of the meat, you are good on meat safety.
The marinated lamb chops are a different type of excellent compared to just using fresh rosemary.
Finally, Meathead: The Science of Great Barbecue and Grilling by Meathead Goldwyn and Greg Blonder is one of the best technique cookbooks for grilling and smoking meat in my library. If you want to understand good grilling/smoking techniques and the basics of this type of cooking, this is an excellent book. Although it contains recipes, it is not a recipe book. I compare it to The Way to Cook by Julia Child for a different type of cooking.
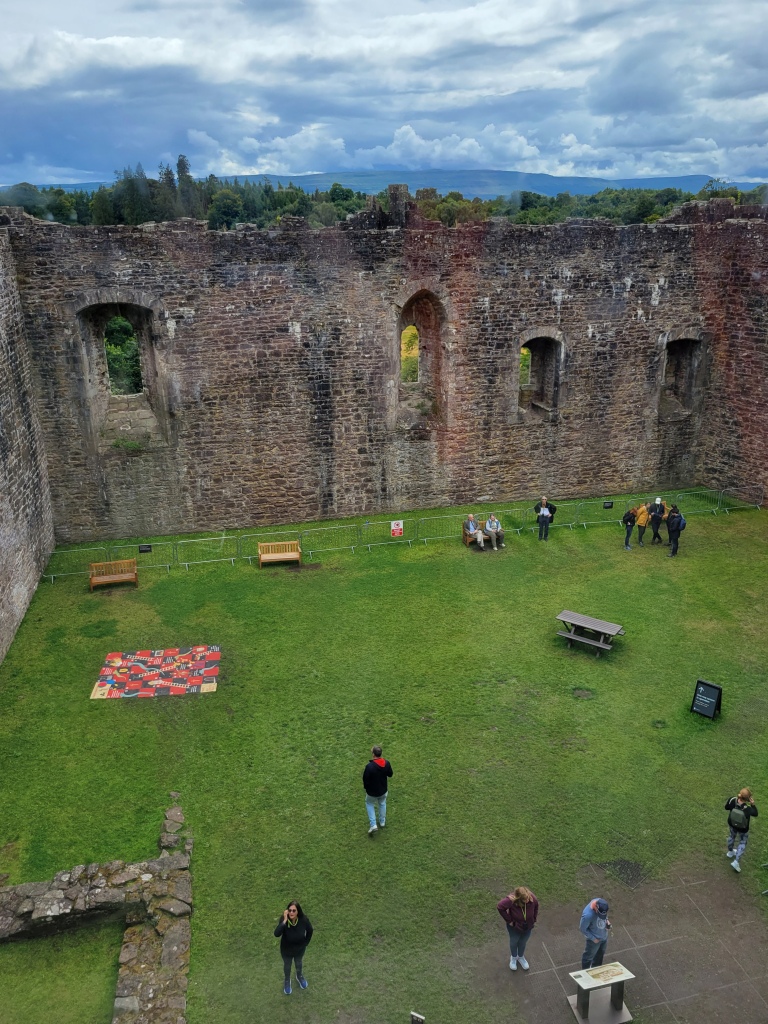
We visited Doune Castle in Scotland. Doune Castle was visited by numerous members of the Scottish royal family including Mary, Queen of Scots. Doune Castle is at a strategic river crossing and had been fortified since the Romans ruled Britain.
We knew Doune Castle mostly through Monty Python & the Holy Grail filming.
In the movie, Doune Castle was occupied by the snooty French. King Arthur and Patsy argue with soldiers of the garrison at the start of the movie.
The song and Dance “Knights of the Round Table” at Camelot was filmed in the Great Hall of Doune Caste.
The kitchen was used as “Castle Anthrax” where Sir Galahad the chaste was almost seduced by the “naughty female inhabitants” who used a fake holy grail neon sign.
The wedding disrupted by Sir Lancelot was filmed in the courtyard and great hall.
The Duchess Hall was used for the Swamp Castle scene.
And most vividly, the Trojan Rabbit scene was filmed in the entryway and the courtyard.
Supposedly, Doune Castle was also used to film scenes from “Outlander,” but I have neither seen nor no nothing about this.
Aerial View of Doune CastleThe Castle & Friendly DogsDoune Castle CourtyardTower at Doune Castle
The audio guide was narrated by one of the Monty Python actors. The narration gave the castle history with the option to obtain additional information about scenes from the movie. It was highly entertaining.
The gift shop offered coconut shells if you needed to ride a horse through the castle.
Lynn, my sister-in-law Sharon, and I went on a three-week tour of Scotland. Most of it was through Stephen Ambrose Historical Tour of the Jacobite Rebellion led by Chris Anderson. Twenty-one of us took the tour which hit general highlights of Scotland in addition to places associated with the Jacobite Rebellion.
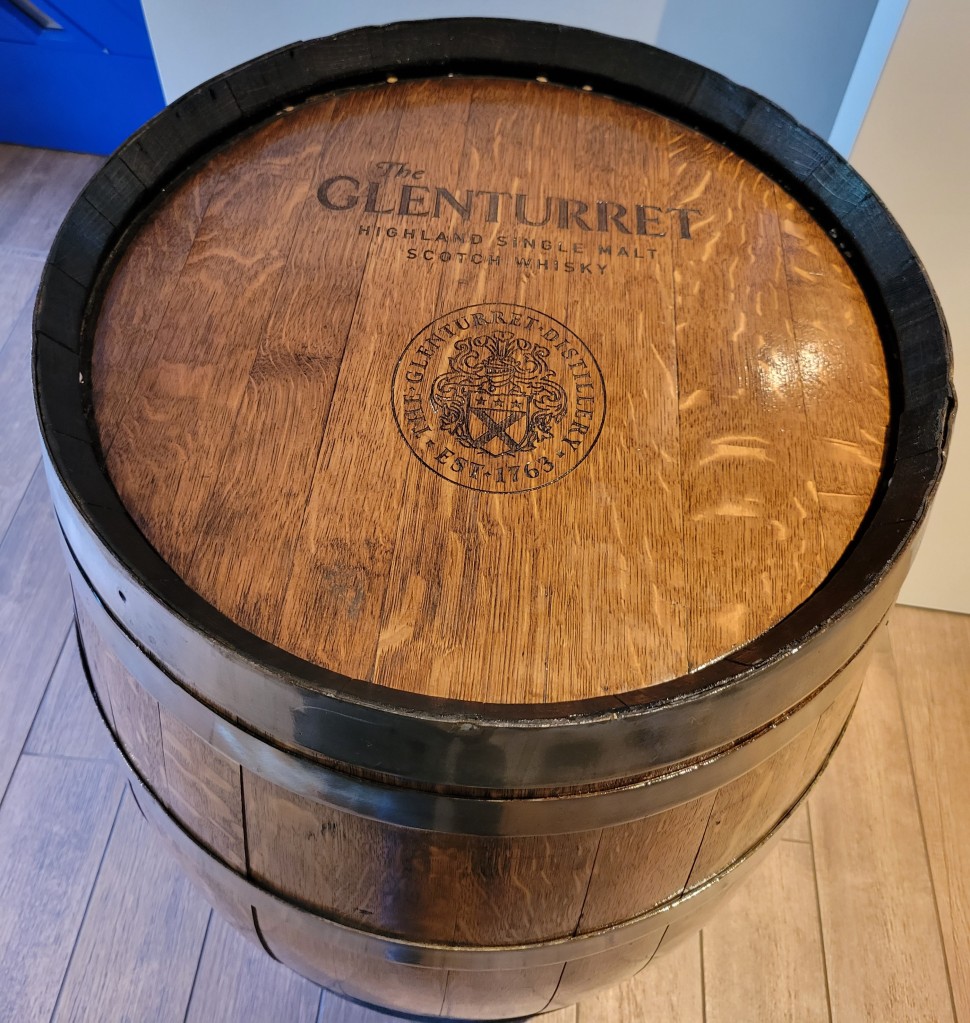
Our tour took us to GlenTurret which claims to be the oldest distillery in Scotland. They had samples of peat used in drying barley for some brands. Peat gives Scotch its distinctive smoky flavor. Almost all of GlenTurret’s production is used in blended scotch and the brand is not available in the USA. I did purchase a bottle of their 10 year smoky and brought it back.
Glenturret Vat
The three of us visited the GlenKinchie distillery on our own. GlenKinchie’s production is one of the four distilleries which make up the Johnny Walker brands.
Scotch is my favorite alcoholic beverage and Scotland is a land of distilleries and sheep. Parts of Scotland are a temperate rain forest, and the Gulf Stream brings lots of rain. There are an abundance of rivers and streams, and the Scots are quite proud of their water and hold the water of England in distain. Scotland is famous for whiskey, sheep, bagpipes, shortbread cookies and fighting men.
There are two broad categories of Scotch: Blends and Single Malts. Single Malts are whiskey bottled from a single batch. Blends mix whiskey from multiple batches and even multiple distilleries. Blends can provide a more consistent flavor from year to year while single malts have far more variation in taste. Scotch snobs tend towards single malts. I’m happy drinking any Scotch that fits my tastes.
My taste in Scotch tends towards somewhat peaty with a smooth finish. For example, I keep the following brands on my shelf: Talisker 10 year; Balvenie 12 year double cask, Benriach smoky 10, Glasgow Blend by Compass Box, Glenlivet 12; Monkey Shoulder and Ardbeg Wee Beastie 5. I don’t care for Laphroaig 10 year, Cutty Sark, Oban Little Bay or Macallan 12 year double cask. This is what I like and not an argument for what is “best” for everyone.
Shops at every tourist attraction in Scotland had a single malt scotch bearing the label of the attraction. For example, a “Culloden Battlefield” single malt scotch is sold in their gift shop. All tourist scotches are bottled by some (unnamed) distillery. Many sell scotch “sample packs” containing mini-bottles of scotch from various distilleries.
I tried 21 different brands of Scotch on this trip that I had not previously drank. Most were good. Some were bad. A bare few I plan to purchase. Below are my results.
Bunnahabhain; Glengoyne; and Old Putney – all were average, but not work keeping in my liquor cabinet.
Deanston 12 – nice finish and taste but a bit too harsh for my taste. Just barely misses the cut.
Tomatin – Very smooth with a caramel finish. Since I don’t care for caramel, this was not for me.
Finlaggan – Smooth with a strong peaty taste. Just a bit too smoky.
Loch Lomond – very smooth but just a little less peaty than I prefer. If I already did not have so many favorites on my shelf, I would purchase this.
Glenfiddich 12 – This was ok, but not good enough to get into my liquor cabinet.
Ileach – Very smooth but a little too peaty for my taste.
Timorous Beastie by Douglas Lange – very nice and not too peaty. This one was a winner. If I can find it in the USA.
Wolfburn Morven – nice with a somewhat peaty finish. Hopefully I can find this in the United States.
Auchentoshan – smooth but pretty bland to my palate.
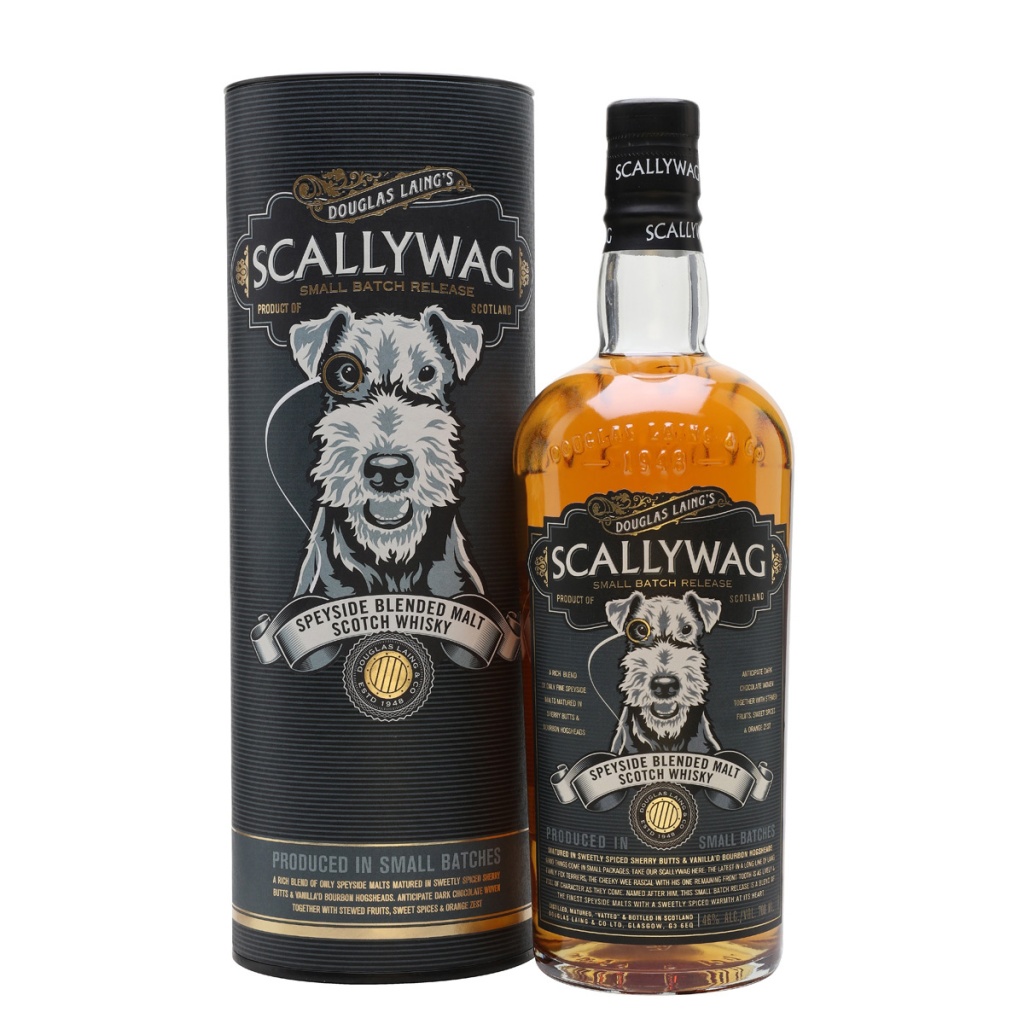
Scallywag – Very good taste but a little harsh. Over ice or with a bit of water it is very good. I may be biased because they have a terrorist on the label and my Panzer is a terrorist (Miniature Schnauzer).
Glenkinchie 12 – this a fruity Scotch with no smoky taste. I dislike it.
Clynelish – good but not great Scotch with some smoky flavor.
Lagavulin – way, way too smoky. Almost like drinking water poured over fireplace ashes.
Cragganmore – this was sweet and tasted almost like toffee. Definitely not my taste.
Glenkinchie Sherry Cask – smooth, fruity flavor that was way too sweet for my taste.
Johnny Walker Gold – this surprised me. I’ve not been a big fan of other Johnny Walker brands but this was quite good. Will probably add this to my liquor cabinet.
Ardbeg Uigeadail – very smooth, very tasty with just the right amount of smoky flavor. Superior to the Wee Beastie in everything but price.
Fifteen of us went on the Civil War Mississippi Campaign battlefield trip through Stephen Ambrose tours. We met in Memphis and a large bus took us, our guide Mark Bielski (a history teacher at Tulane University) and our tour manager/gopher through the battlefields ending up in New Orleans. Our trip started on Satan’s Day (April 15) and the tour ran for eight days. I went solo because Lynn had seen many of the sites and had a conflicting crafty class.
We had a good group. This tour everyone was from the USA with four married couples, a Dad (retired Marine) and his daughter (current Army helicopter pilot), five solo males and one solo female. Everyone was either highly interested in this history or traveling with their spouse in good humor.
Mark Bielski was highly knowledgeable and engaging. His only noticeable fault was his “overly generous” admiration for the skills of General Earl Van Dorn of the Confederacy who met a tragic end by the hand of a jealous husband. Sorry, insider joke there. Bielski compared every screwup by every officer to General Van Dorn’s record.
We started with the Naval Battle of Memphis which occurred on June 6, 1862. A Union river fleet routed the smaller Confederate river force. Amazingly, the Confederates failed to garrison Memphis so at the conclusion of the naval battle, Union forces walked into town and captured it.
The Battle of Memphis was also the most enraging part of the trip. We went to the bluff overlooking the Mississippi where civilian crowds gathered to watch the battle. The crowds could not see very much after firing started due to distance and smoke from the cannon fire. The bluff had been turned into a park named “Confederate Park” which originally had a statue of Jefferson Davis (President of the Confederacy) and a series of historical markers describing the battle. However, the local government renamed the park and removed the statue of Jefferson Davis. I can understand that part. But the idiot city government also removed every historical marker describing the battle that took place. This was leftist stupidity. The removal of the historical markers just deleted the history of a significant Confederate defeat. This behavior is mirrored in history by the Taliban destroying ancient statues in Afghanistan, the Russian Commies dynamiting and burning thousands of historical churches and the Chinese Commies burning Buddhist libraries and other historic monuments that had stood for thousands of years. Congratulations Memphis! You are in great company!
Shiloh was next. The Battle of Shiloh was on April 6th and 7th, 1862. Union forces under Grant took Forts Henry and Donaldson in NW Tennessee very early in the war. These victories closed off the Ohio and upper Mississippi River to the Confederacy. Shiloh is in the extreme Southern part of Tennessee very close to the Mississippi border. The terrain is beautiful with the Tennessee River at one end of the Battlefield and woods and meadows throughout the rest of the Military Park.
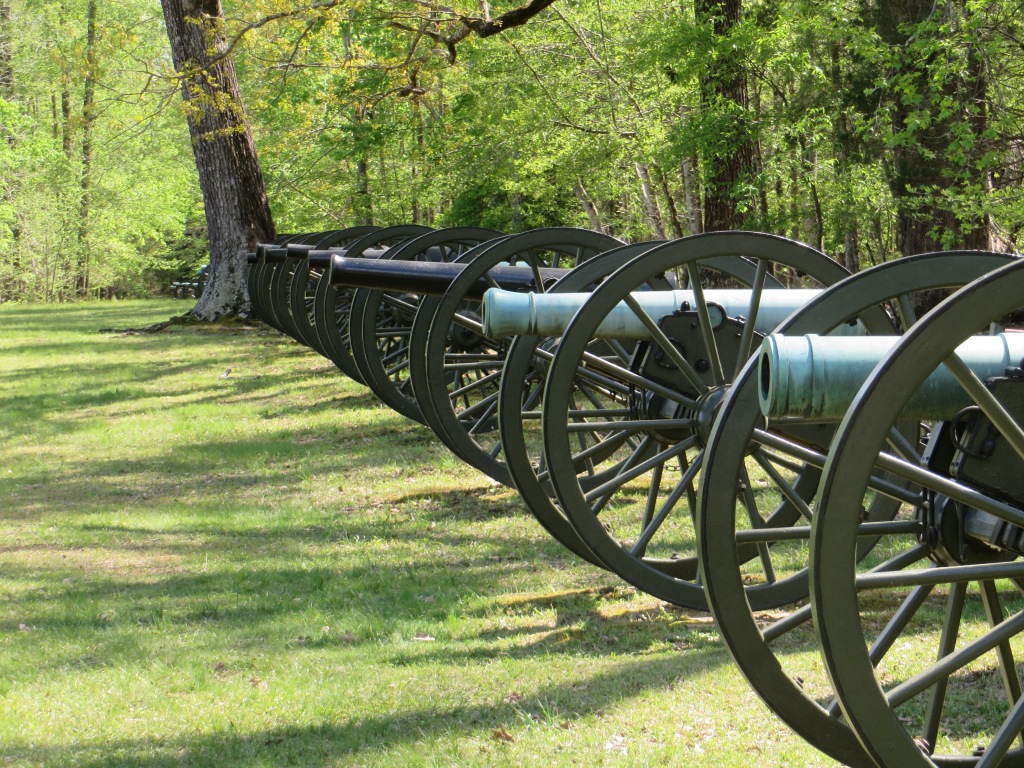
Shiloh Church Replica at Shiloh CrossroadsHornets Nest at ShilohRuggles Battery at Shiloh – Hornets NestAlabama BatteryConfederate Artillery
This was early in the war and neither army was well trained. The Confederates under Albert Sidney Johnson had a surprise dawn attack on Union Encampments. The Confederates slowly pushed back the Union forces during the day until they were very close to the Tennessee River. The day ended with the Confederates confident they would win the battle the next day by trapping the Union Army against the Tennessee River. Johnson died during the first day of battle and PGT Beauregard assumed command.
Memorial to Albert Sydney Johson who was killed during the battleDefeated Victory Confederate Monument at Shiloh
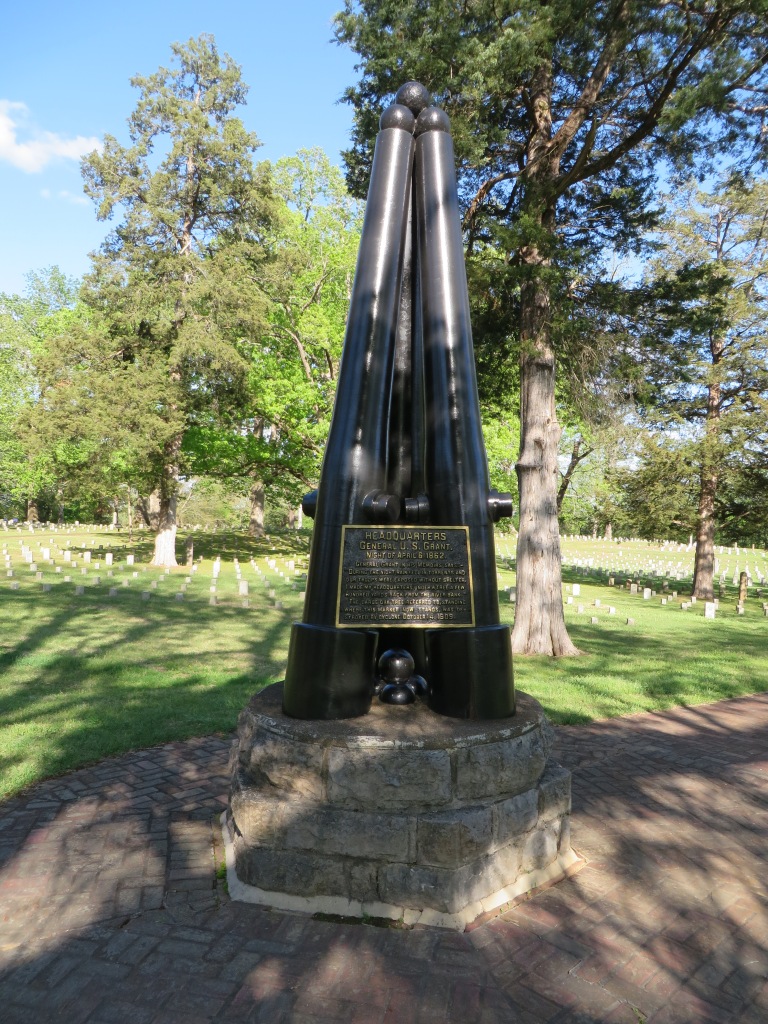
During the night, Grant was able to bring in fresh troops. He also benefited from river warships carrying artillery. Grant’s army counter-attacked during the 7th and largely retook the ground lost the previous day. Although the Union army held the field, they had more total casualties than the Confederate forces.
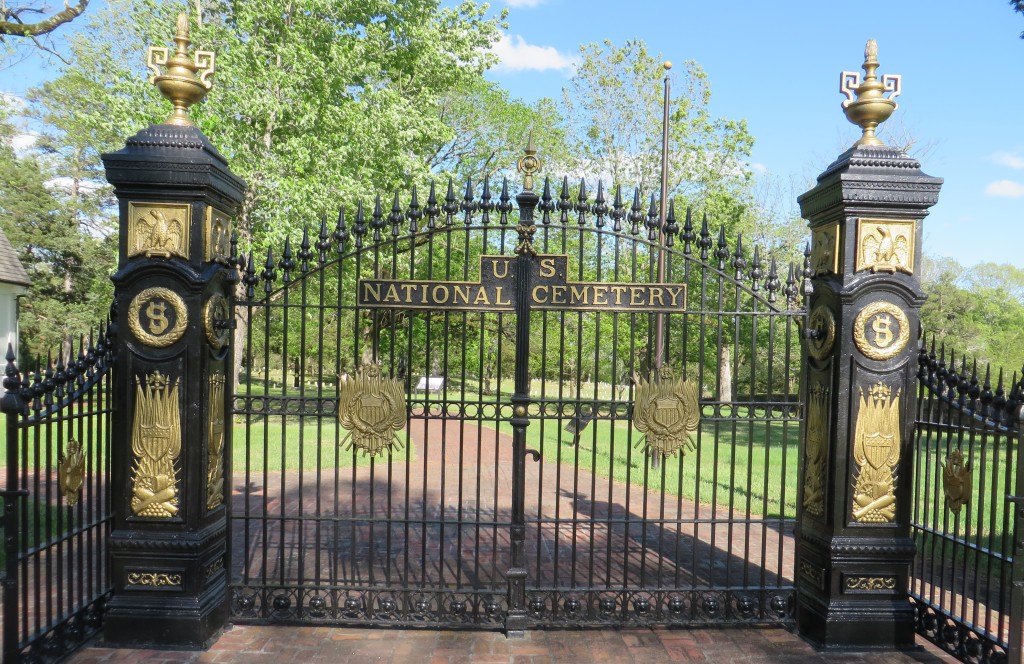
Grant’s HQ After First Day of Battle close to the Tennessee RiverGate to US Cemetery – No Confederates Buried Here
In my mind, Shiloh was a tactical draw and a strategic victory for the Union. By the end of the battle the Union maintained control of the Ohio River, the upper Mississippi, and the Middle Mississippi to Memphis. Union forces were threatening the vital rail junction at Corinth, Mississippi while maintaining good supply lines through river transport for their armies. Aside from Memphis, everything in Tennessee from Nashville to the West was under Union control after Shiloh.
The next day we went to Corinth. In the mid-1800s US railroad tracks had not been standardized to a single gage. There were many independent railroad lines which were not inter-connected. Only one rail line ran from an Atlantic Port (Charleston) to the Mississippi and that rail line ran through Corinth, Mississippi. A second North/South Railroad line crossed the Charleston line in Corinth.
Famous Corinth Rail CrossroadsCorinth Railway Station
Corinth was a tiny town with limited fresh water at the junction of two of the most useful rail lines in the South. Corinth was taken by the Union on May 30, 1862 after a month long siege. Union forces were twice the size of the defending Confederates under PGT Beauregard. Beauregard fought a brilliant holding action and was able to extract almost all of his forces from the siege which was probably the best anyone could do under the circumstances.
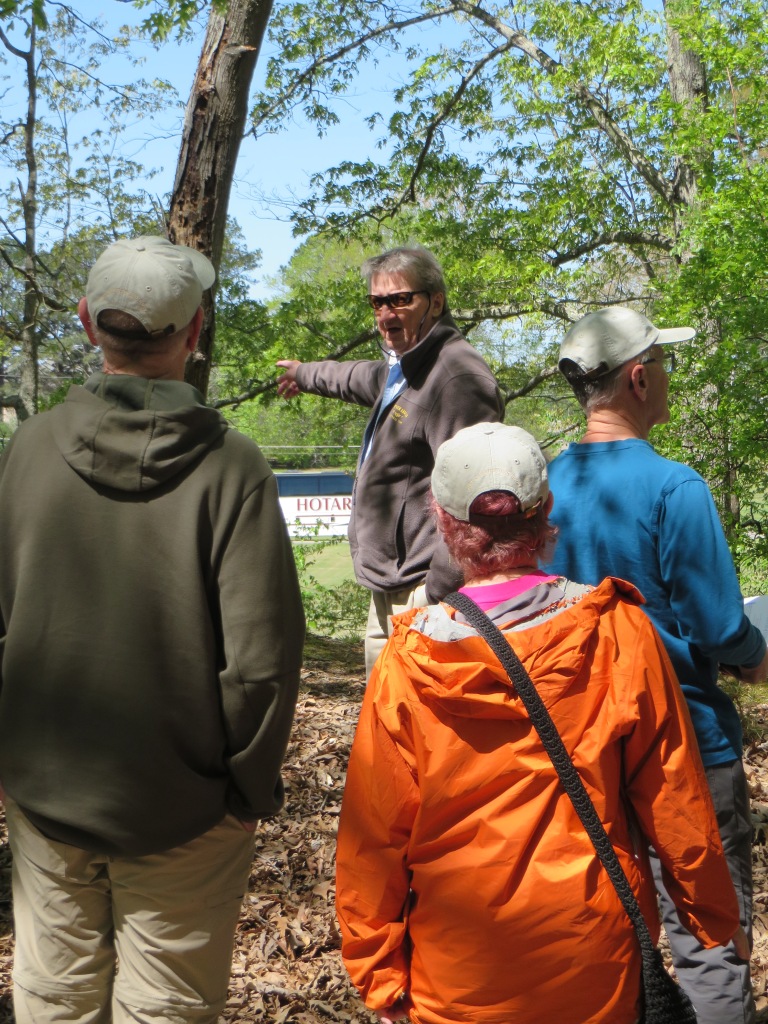
Example of Fortification ConstructionCorinth Fortifications 1862Mound is Remains of Corinth FortificationsMark Discussing the Corinth Fortifications
Like most Civil War campaigns, far more men died of disease than battle. Corinth was especially bad because of the huge numbers of troops stationed at a location with limited fresh water.
The second battle of Corinth occurred on October 3-4, 1862. The leadership of both forces was abysmal. The Confederate Commander was General Earl Van Dorn who launched a series of frontal assaults uphill against entrenched infantry and artillery. That strategy failed at Corinth as it did pretty much every other time it was tried during the war when the attacking force did not have at least a 3:1 advantage.
The Union Commander was General William Rosecrans. He gave confusing orders to his subordinates, failed to employ half of his army, and failed to take advantage of an enemy General frontally attacking a strong position with largely open flanks. Van Dorn’s forces were amazingly brave and came close to succeeding because Rosecrans failed to concentrate his forces or hit either open flank. Union forces held the ground and had fewer casualties, so this was a tactical win. More importantly, the critical railroad junction remained in Union hands which was a strategic victory.
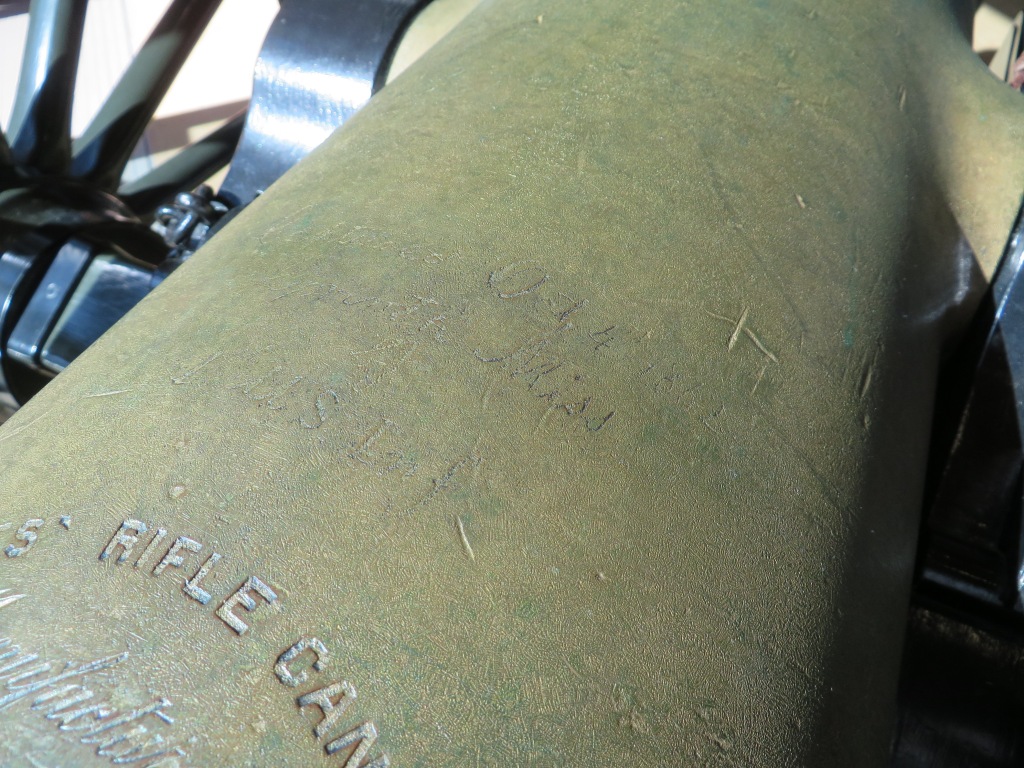
The museum at Corinth is small. The battlefield preservation is a fraction of the battle grounds of either the first or second battle of Corinth. What is preserved is a key position in the Union line where Van Dorn’s troops launched a frontal assault. One remarkable exhibit is a signed cannon captured during the battle. The signatures were scratched into the barrel of the cannon.
Signed Artillery Corinth Museum
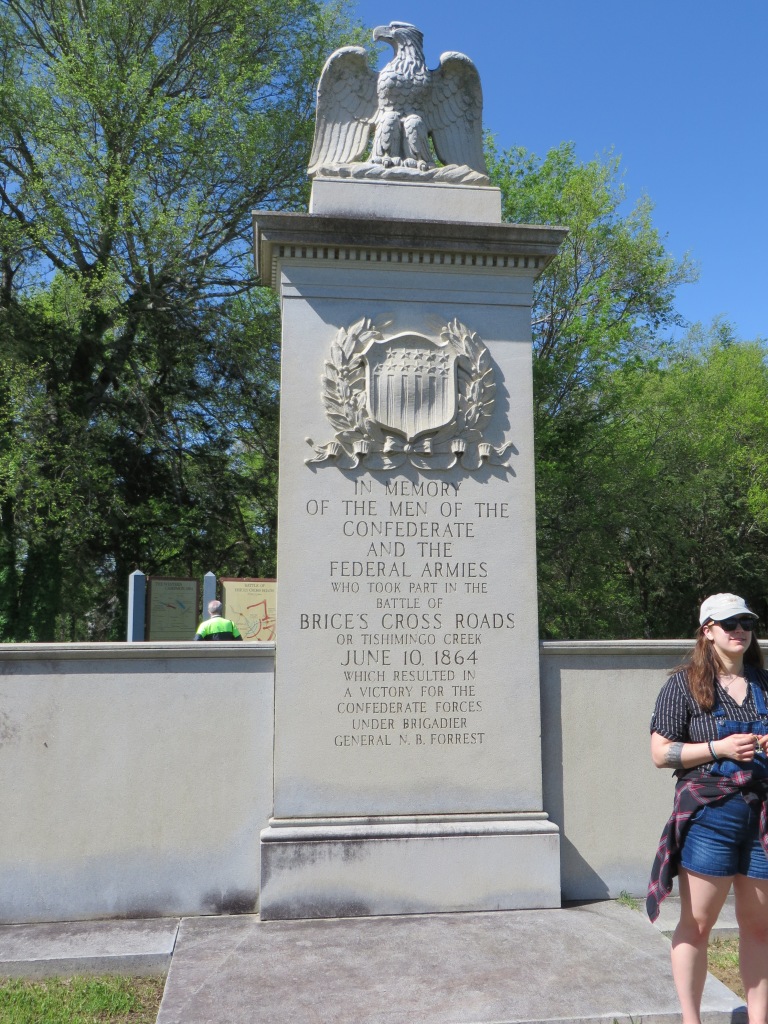
The Battle of Brice’s Crossroads was our last stop of the day. The battle was on June 10, 1864 when the war was largely over in the West. Vicksburg had fallen, the Union controlled all of Tennessee and Sherman was marching on Atlanta. The Confederates were led by Nathan Bedford Forrest, a man with no formal military training who demonstrated amazing decision making throughout the war.
Battle of Brice Crossroads
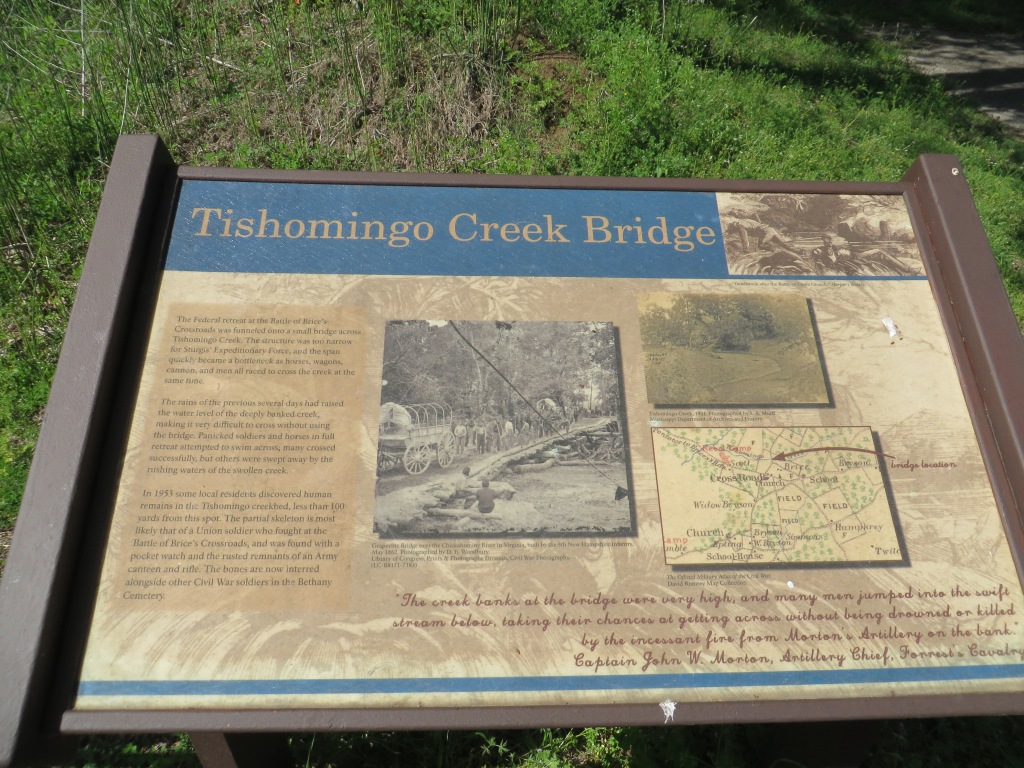
Although outnumbered 2:1, Forrest won a smashing victory by concentrating his troops and almost managed to capture the army led by General Sturgis. The Union collapse was so awful and Forrest’s troop’s pursuit so strong that there was a rout when Confederate forces took a ridge overlooking the single bridge over Tishomingo Creek. Forrest also managed to capture 16 guns and a large amount of supplies. Although Forrest won a huge tactical victory, his forces were unable to either cut Sherman’s main supply lines or threaten Tennessee.
Tishomingo Creek BridgeHill Overlooking the BridgeBottom of Hill Looking Up the Ridge
It is very unusual in military history when a force routs an army twice its size that also had superior firepower (Union forces had a large amount of artillery while the Confederates had none). In this case, Forrest concentrated his men and kept pushing hard. Union morale broke and a route ensued. Several regiments of black troops (both freed slaves and free blacks commanded by white officers) managed to delay Forrest’s advance long enough for the Union Army to escape. Napoleon said that the mental aspects of battle outweigh firepower by a level of 2:1 and this is an excellent example.
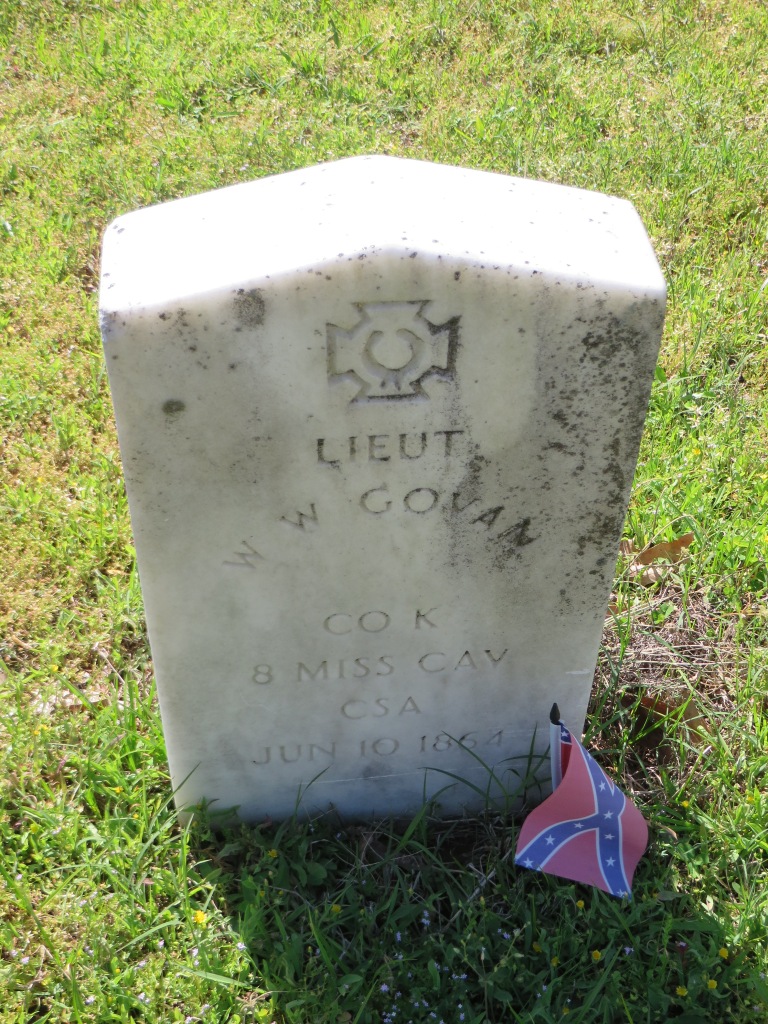
There is a small cemetery where Confederate soldiers were buried.
Many Battles of the Vicksburg Campaign commanded by General Grant for the Union and by General Pemberton for the Confederacy were covered over a two day period. We picked up local guide Parker Hills for these sites. Mr. Hills is a retired US Army Officer and self-taught battlefield archeologist. His wife of many years accompanied him. Mr. Hills was amazing for both his knowledge and enthusiasm.
Vicksburg was very high ground overlooking the Mississippi River. It was defended by a large army and had a lot of artillery covering the river. Grant could not take Vicksburg by frontal assault. Grant used his better supply train and superior river naval forces in an unorthodox campaign to eventually capture Vicksburg. Many of Grant’s initial attempts were unsuccessful. But unlike many senior Union commanders during the war, Grant was tenacious and kept trying different strategies until he found something that worked. Sometimes his decisions were terrible (Cold Harbor and the Wilderness to name two), but he realized he had superior overall numbers, better logistics, and could win on the strategic level if he kept pounding away.
We went to the Windsor Ruins which are very picturesque, but have little to do with the war. This large plantation was destroyed by fire in 1890 with only twenty-nine enormous columns left standing. Prior to the War, Mississippi was the wealthiest State on per capita terms and this is a monument to Mississippi’s wealth at that time.
Windsor Plantation RuinsWindsor Column Top
We visited Grand Gulf, Mississippi where Confederate land batteries defeated a Union naval flotilla under David Porter. This defeat caused Grant to drop this site as a potential landing to bypass Vicksburg. Little remains today of the battle. Mississippi Floods and the passage of time have done their work.
We then went to Port Gibson. On May 1, 1863 at Port Gibson Confederate forces under John Bowen were eventually defeated by almost four times their numbers of Union troops, mostly directly under Union General John McClernand. The defenders put up a stubborn defense but eventually had to withdraw. This was the first successful attempt by Grant to bypass Vicksburg and land substantial troops in Mississippi below Vicksburg. Aside from a couple of historic homes and a few markers there is little to see from the battle.
Grant landed substantial forces at Bruinsburg which consolidated his forces below Vicksburg. There is little left of historical significance of Grant’s landings below Vicksburg. Preserving much of anything not on very high ground is not easy.
To me the most interesting thing about Grant’s amphibious landings and the subsequent battles at Raymond, Jackson, Champion Hill and the siege of Vicksburg was Grant largely abandoned his supply line. Continuing to run supply ships past Vicksburg would have been quite dicey. After the battles of Raymond, Jackson and Champion Hill, Grant was almost out of munitions. Grant’s strategy was amazingly risky. But Grant knew the cautious temperament of Confederate General Pemberton from their shared time at West Point and the US Army. A more aggressive Confederate Commander could have held off Grant long enough for his supplies to be exhausted which could have resulted in the destruction of the entire Union Army of the Tennessee. Knowing the risks, General Sherman kept trying to talk Grant out of this strategy to no avail. But if it works, it is a great strategy. The risks Grant ran in this campaign from a logistics perspective are head shaking in retrospect.
From a trip logistics standpoint, we met at our hotel in Memphis. A large bus with a wonderful driver joined us. We stayed in six different hotels over the eight day trip. The Lodge at Pickwick Landing (a Tennessee State Park in Counce, TN) was especially nice. At our last hotel in the French Quarter in New Orleans there was a huge weekend social by a Fraternity with guys (and their dates) from many different schools. Seeing the kids dressed up was fun.
We had a group dinner most every night and some of the venues were outstanding. Some of the buffet food we had for lunch was in tiny places in Mississippi featuring food like my Mom used to cook before my Dad had his first heart attack. I really enjoyed the food since I get that sort of meal so seldom. The trip involved a lot of walking and long days – but that enabled us to see a lot of things most tours miss. We got going early in the morning and finished up late in the afternoon most days.
I’ll follow this up with a second blog post discussing the battles for Vicksburg, Natchez, Port Hudson and New Orleans.
This weekend was Scots Heritage in Franklin, NC. All sorts of activities were available. A public parade of people dressed as Scots some playing bagpipes. Shortbread contest.
At the Fairgrounds they had Scottish Games, many bands and dancing demonstrations plus food. I tried a sausage (unfortunately in a puff pastry) and something close to Haggis (it had oats, liver and spices. I doubt it was cooked in a sheep stomach).
It was hot and we did not stay very long. Men walked around in kilts. We watched several bizarre, traditional “Scottish Games.” These mostly involved men or women in kilts tossing heavy objects over their heads, backwards, to hopefully clear a ten-foot (or higher) bar. We saw Men accomplish this with a 55lb weight and a woman easily accomplish this with a 35lb weight. I would not pick a fight with any of the participants.
There was a “Scottish Reenactment” which we did not see. I’m guessing it consisted of adult males in kilts who got into a large brawl after consuming a lot of alcohol. Lots of Scots settled in this area. There are lots of mountains, huge amounts of fresh water, and poor rocky soil. It is wet and cold much of the year. Having been to Scotland, this area probably felt like home and they established new marginal farms and flocks while distilling a lot of whiskey. Franklin has a large proportion of redheads, blondes, and brunettes with very pale skin. Seeing a man in a kilt is not noteworthy.
One couple had four Shetland Sheepdogs (Shelties) and had many people come up and tell them they were “beautiful collies.” All were much smaller than Lynn’s Dash. Lynn was irritated she did not take her dog to the event.
Four Shelties
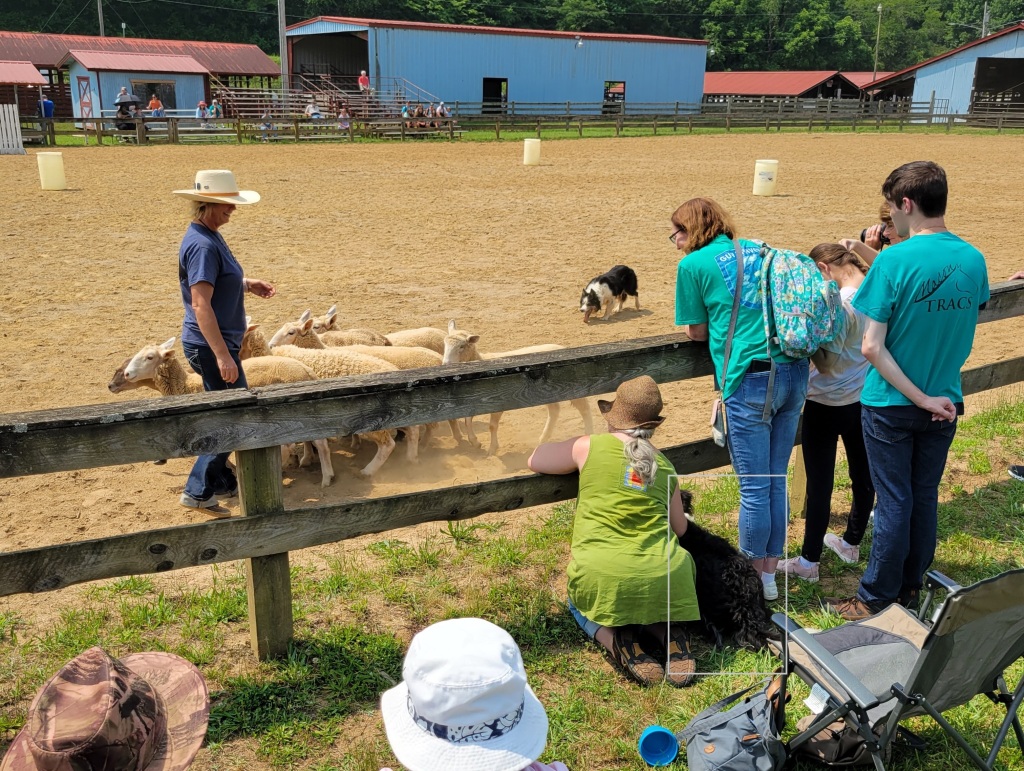
We saw a live demonstration of a border collie herding sheep. The trainer informed us that the collie was 11 years old and past his prime. Her dog ignored all instructions from her husband. Her grandson hates the dog because he gets herded. The sheep were in the animal show/rodeo arena. The sheep wanted to graze on the grass at the edges of the enclosure. The border collie kept annoying them.
The dog had those sheep under its paw. He kept herding them into a tight circle near the trainer. The trainer would make the dog stay (to his annoyance), the sheep would wander away, and the process began again. At one point two sheep got under the boards and out of the enclosure. The dog quickly got them back into the arena.
The four Shelties were indifferent to the sheep. But the young, untrained border collie was highly aroused and moaned because his owner would not release him to inexpertly annoy the sheep.
Young Border Collie Prevented from Annoying the Sheep
This has been an outstanding year in the mountains for strawberries. Lynn has been purchasing and processing them. She has made a bunch of various strawberry syrups. Some are straight strawberry while others are flavored with fresh mint, lemon, or other things. Many, many fresh strawberry simple syrup gin & tonics (or gin & club sodas) have been consumed. She made me strawberry, rhubarb crumble for my birthday.
I got used to cooking outside as much as possible living in Alabama for more than thirty years. When it is blistering hot outside, you don’t want to heat up your kitchen. My brother Jones usually roasts asparagus and other vegetables in the oven and they turn out well. But that heats up your kitchen which we try to avoid.
I’ve had trouble getting grilled asparagus to turn out as well as I’ve hoped. My two problems are: 1] The asparagus falling through the grill grates and turning into ash and 2] Too much flaring up from the marinade partly chars the asparagus.
This time I combined a technique from one grilling cookbook and a marinade from a second cookbook for an excellent result.
The technique takes a minimal amount of extra effort. As normal, wash the asparagus stalks in water and break off any purple colored parts of the stems to avoid the highly fibrous parts of the plant. Next, I took wooden toothpicks and pierced the stems of the trimmed asparagus as you can see below. This makes it much easier to turn on the grill without losing stalks between the bars of the grill. The asparagus stalks are spaced apart on the toothpick to allow each stalk to grill evenly.
The marinade was:
1/4th cup of extra virgin olive oil
1 tablespoon of red wine vinegar
1 teaspoon of Dijon mustard
1 tablespoon of drilled dill
1 teaspoon of salt
½ teaspoon black pepper
Whisk the marinade ingredients together. Put the toothpicked asparagus into a flat Pyrex dish and pour the marinade over the stalks. We put the marinade over the asparagus about an hour before grilling.
I grilled boneless pork cutlets while grilling the asparagus. The pork cutlets went over direct heat (2 burners on a 3 burner grill) while the asparagus was on the grill over the unlit burner. Keeping the asparagus off of direct heat allowed it to warm up and start cooking without burning.
After the pork cutlets were done (I always use an instant read meat thermometer for thick cuts of meat), I put the asparagus over direct heat for about 2 minutes to complete the roasting process.
The asparagus was cooked, yet crisp and tasty. The marinade was not fatty enough to cause the burner to flare up.
I smoked my second whole duck this week. They are quite tasty, and we strongly prefer duck to chicken. We bought the duck frozen at Aldi and the price was about $3.50 a pound which is more than chicken but far less than beef.
Duck has a fattier outer layer just under the skin compared to land birds. That layer of fat improves the taste of smoked whole duck compared to chicken.
My smoking recipe for duck is simplicity itself. I spatchcocked the duck and removed the backbone. This is an important step. If you don’t spatchcock the duck you leave a big air pocket which will cause the duck to cook unevenly. I then flattened the duck out. I do not recommend smoking the giblets with the duck. I used hickory chips in my smoker and used a remote read meat thermometer to an internal temperature of 170 degrees.
The duck was evenly cooked, very juicy and tasty. I did not use a rub on the duck. If you decide to use a rub, you will need to either inject the spices just under the skin or peel the skin back and put the rub directly on the meat. However, removing the fatty skin layer will probably result in a drier smoked duck. But since hickory smoked duck is so yummy as is, I doubt I will experiment with using rubs on the duck.
We got three meals for two off of the duck meat. We will have additional meals off of the smoked duck skin and bones making a basic smoked duck soup.
The thinner part of the wing did dry out completely. We just threw it into the soup stock. If you like the thin, minimal meat, covered in skin part of the wing to eat, I suggest wrapping the last two joints of the wing in aluminum foil before smoking.
Overall, spatchcocked hickory smoked duck gave us four or five tasty meals with minimal preparation and effort.
Apologize for not having pictures, but I was very hungry when the duck came out of the smoker at supper time.